
AIP4Win 2.1.10
Including individual and stacked "raw" files from Nikon's NEF and Canon's CRW and CR2 formats.
The images used for this imaging session were stacked in How to Stack DSLR "raw" files. The images were assembled from seven exposures each 299 or 300 seconds long plus one exposure 599 seconds long using a Canon Digital Rebel XT DSLR camera with 8 megapixels, and saved as CR2 "raw" format files.
Tip for Users:
AIP4Win has extensive context sensitive help. To summon help for any tool, here's what to do:
Press the F1 key.
It's that simple!
Load the Color Channels
To load a set of color channels, do the following:
From AIP4Win's main menu, select File > Open Image.
The Open Image(s) dialog box will appear.
Select the three color channels
previously assembled. The color channels can be stacked
CCD images taken with an astronomical CCD camera or split
from a color DSLR image. In this session, the color
channels images are:
HN_R.fts
HN_G.fts, and
HN_B.fts.
Click the Open button.
AIP4Win will open the three images. The images in this example were previously binned 2x2.
Your
computer screen should look something like this:
Tip for Users:
By default, AIP4Win automatically resizes image windows when you zoom or activate them. However, when you're trying to manage several large images on the screen, autosizing makes them hard to control. To make handling multiple images more tractable, turn off autosizing.
From AIP4Win's main menu, select Preferences > Customize. The Prefences window will open.
Click on the Preferences tab.
Uncheck the "Autosize Image when Zoomed" checkbox.
Click the "Close" button to close the preferences window.
Once you have done this, you have complete manual control over the size of each image window. As an added bonus, if you place the mouse cursor at a location you want in the center of the image window and then shift-click on a specific feature (press the shift key and click the mouse button), the image will automatically center on that location and remain centered when you zoom the image.
Examine the Images (optional, but useful to do)
Even a cursory inspection shows these images to be rather noisy. Even the green image, which is considerably better than the red and blue images, has a scattering of residual hot pixels and a low-level pattern of streakiness caused by uncorrected dark current.
The amount of noise in images is often expressed as the signal-to-noise ratio, or SNR. AIP4Win has tools that allow you to measure the SNR quite easily.
Here is how to measure the signal-to-noise ratio for the green image:
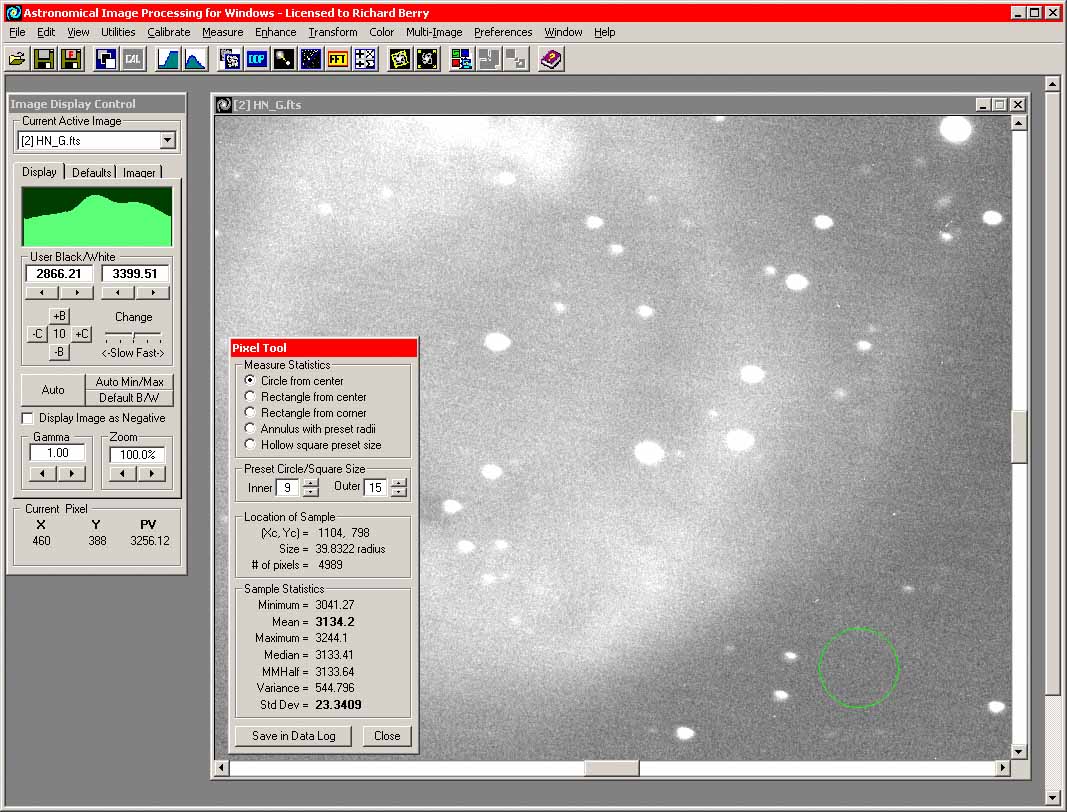
From AIP4Win's main menu, select Measure > Pixel Tool.
The Pixel Tool will open.
In the Measure Statistics panel, select the Circle for center ratio button.
Place the
mouse on a starless area of the sky background as shown
in the picture below:
 .
.
Hold down the left mouse button and move the mouse.
AIP4Win will draw a circle on the image.
Release the left mouse button.
Results appear in the Sample Statisitics panel.
Make a note
of two of the readings:
[Sky background] Mean = 3134
[Sky background] Std Dev = 23.3.
Place the mouse on the brightest part of the nebula.
Hold down the left mouse button and move the mouse.
AIP4Win will draw a circle. The circle should be about the same size as the sky background circle, but should include only nebular aprts of the image.
Release the left mouse button.
Results appear in the Sample Statisitics panel.
Make a note
of one of the readings:
[Nebula signal] Mean = 3325.
Subtract the
sky background mean from the nebula mean:
3325 - 3134 = 191.
This value (191) is the signal from the nebla.
Divide the
signal from the nebula by the noise (i.e., the standard
deviation in the sky background):
191 / 23.3 = 8.2.
This value is the signal-to-noise ratio.
Signal-to-noise ratio should always be calculated this way, that is, SNR = (Object - Sky)/(Sky noise).
As a rough rule of thumb, the signal-to-noise ratio should be higher than 10, and for really great-looking images, it should be over 100.
To increase the signal-to-noise ratio for the next set of images you take, you could:
Increase the exposure time of the images.
Increase the number of images you stack.
Decrease the focal ratio of the optical system.
Smoothing with a Median Filter
It is usually easier and more effective to correct image problems on the individual color channels rather than in a color image in which the color channels are mixed with one another.
In these images, the dominant noise type is hot pixels, that is, pixels that have unusually high value compared to the pixels around them. An effective treatment for hot pixels is a median filter. Median filters remove outlier pixel values, replacing them with values typical of the local region. Although median filters degrade image sharpness, in this case, the large star images imply that there's not much small-scale detail to be degraded.
To apply a median filter, do the following:
From AIP4Win's main menu, select Enhance > Rank Process.
The Rank Process Tool will open.
In the Process Type panel, select Median from the list box.
In the Radius panel, enter a value of 2. This set the size of the region AIP4Win will use to compute the median.
In the Median panel, leave the default value of 0.5.
Click the Apply button.
Repeat this process for each of the color channel images.
When you line up the images side-by-side, you should see that they now look considerably less noisy:
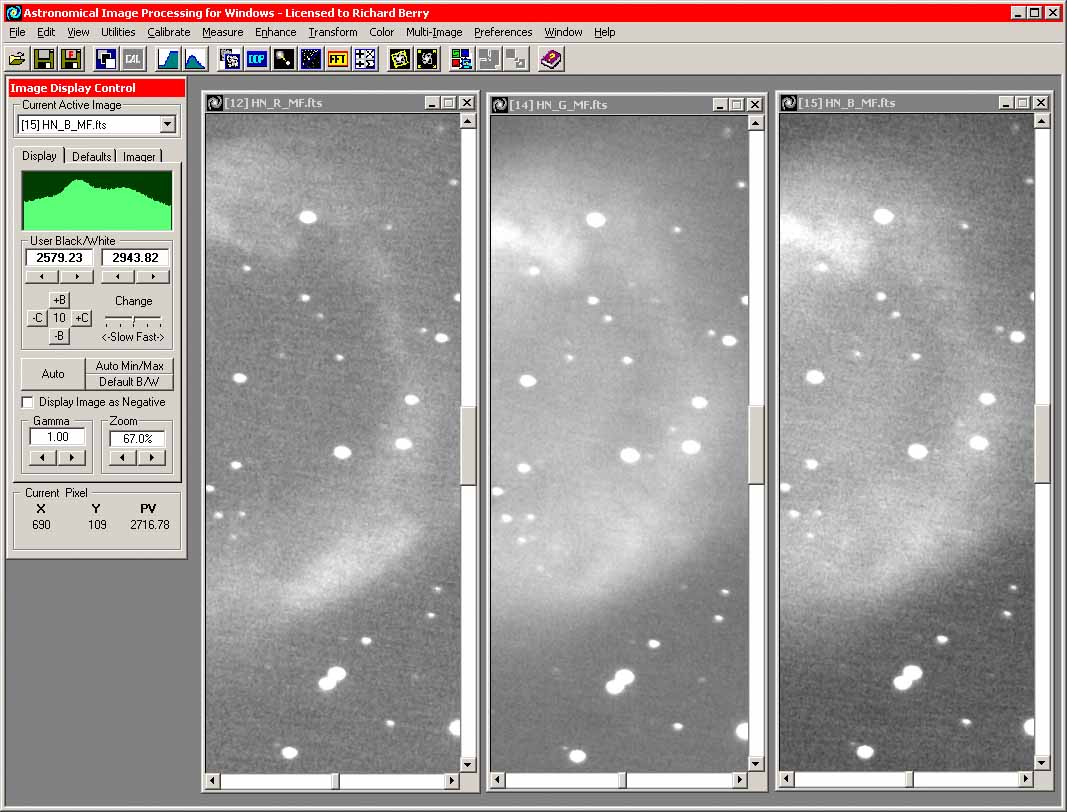
Note that more agressive efforts to remove the noise would probably result in a loss of sharpness or an overly smooth "plasticy" appearance.
Save each of the median filtered color channel images as follows:
From the AIP4Win main menu, select File > Save as FITS.
The Save FITS File As... dialog box will open.
Enter a descriptive file name such as "HN_R_MF." The appended MF tells you the image has been median filtered.
Click the Save button.
The Save Image As FITS File dialog box will open.
From the File Format panel, select the 32-bit Floating Point option.
Click the Save File button.
The image will be saved using the options you have selected.
Enhancing versus Editing your Images
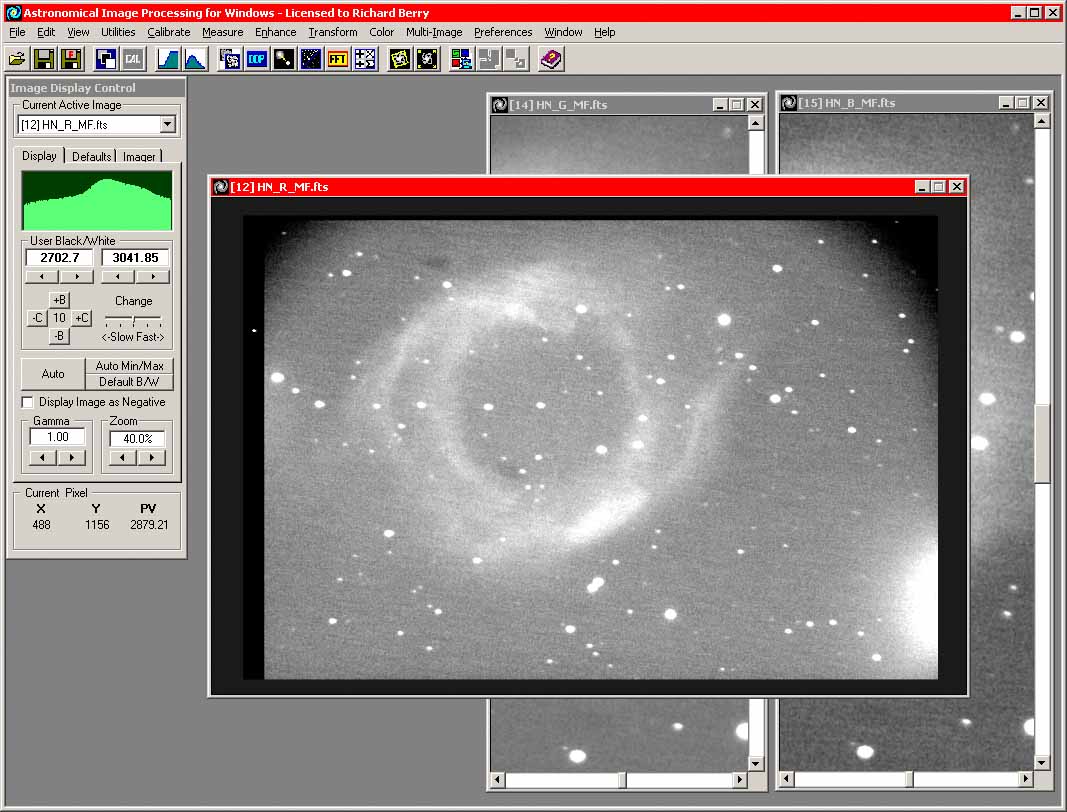
If you reduce the zoom enough to see the entire image, vignetting in the corners is quite evident. The actual loss of light is not very great; if you run the mouse around the image and compare general sky background values with those in the corners, the loss is well under 10%. However, because it is necessary to stretch the image so strongly: from 2702 to 3041 in the example below, even a minor darkening in the corners shows up strongly.
If we had taken flat-field frames when we took the images, it would be possible to divide out the vignetting. In this case, however, we're going to make a strategic decision to leave the images are they are. Artificially lightening the corners because we think they should be light crosses the fine line between enhancing the image and editing the image. Enhancing and editing images often produces similar results. One way to define the difference is that enhancement procedures are applied to an entire image equally, whereas editing is done to part of an image to fix something that we happen to dislike.
When we applied the median filter to the images above, for example, the filter was applied to every pixel in the image. If the pixel met certain objective and repeatable criteria, its value was changed. If we applied a flat-field to the image, every pixel would be changed as dictated by the flat-field's mapping of light reaching the sensor. However, if we retouch the corner pixels so that they look nice, we've edited the picture. Imagine the chagrin of the amateur astronomer who decides to edit out a fuzzy spot -- and it turns out to have been a comet!
Building a Luminance Images
We're nearly ready to convert the color channel images in a color image.
First, however, we're going to create two luminance images. Taken together, the red, green, and blue color channels comprise the chrominance (choma = color) component of a color image. The other component of a color image is luminance (lumina = light). When we build a color image, it is easier to control the luminance and chrominance using separate controls. That way, if the color is a little wrong, you can adjust the color without changing the image brightness. Likewise, if the brightness is a bit off, you can lighten or darken the image without changing its color.
In this case, we will make two luminance images. One of them is simply the average value of the color channels. In this luminance image, each color channel is equally represented. Our second luminance image is the average of the first luminance image and the red image. The second luminance image contains more red in the luminance. When we make the color image, we will blend the two luminance images.
To make a luminance image, do the following:
From AIP4Win's main menu, select Multi-Image > Average Combine > Images.
The Select Images for Average Combine dialog will open.
Select the three color channel images.
Click the Add All button.
The images will be transferred to the average column.
Click the OK button.
AIP4Win will create a new image that is the average of the color channels.
From the AIP4Win main menu, select File > Save as FITS.
The Save FITS File As... dialog box will open.
Enter a descriptive file name such as "HN_L_RGB." The RGB reminds you that this luminance image contains equal red, green, and blue channels.
Click the Save button.
The Save Image As FITS File dialog box will open.
From the File Format panel, select the 32-bit Floating Point option.
Click the Save File button.
The image will be saved using the options you have selected.
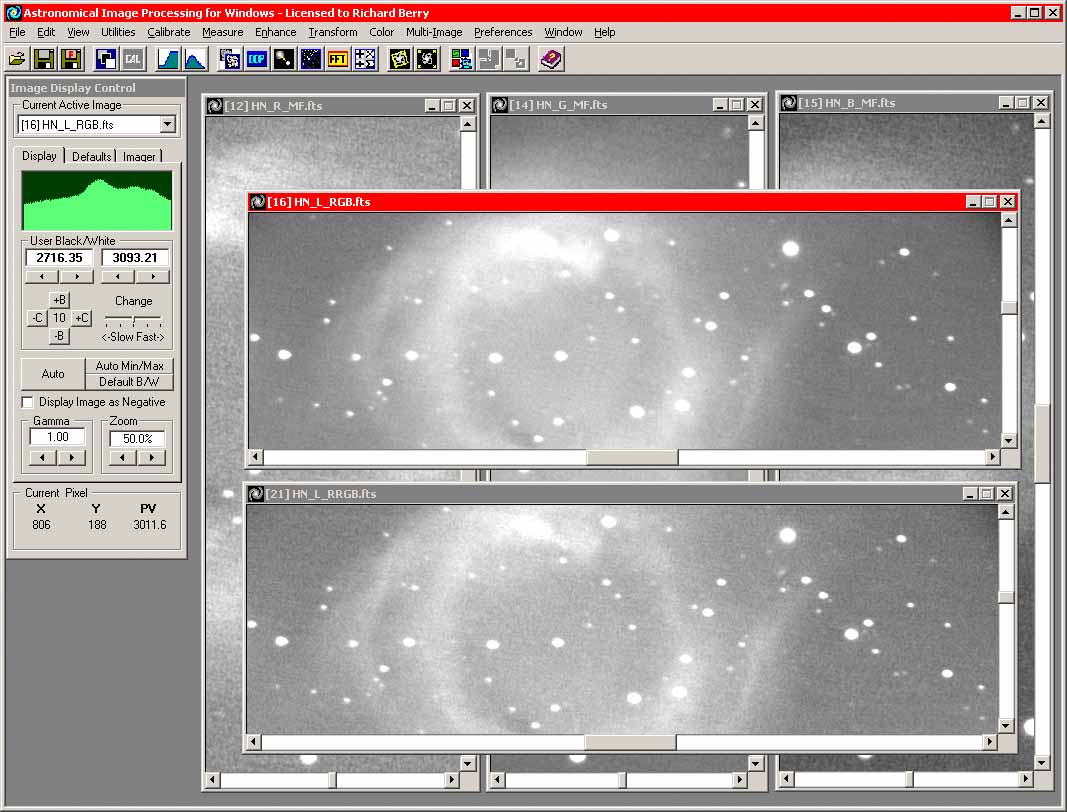
Repeat this process, except this time transfer only the HN_L_RGB.fts and HN_R_MF.fts images to the average column by using the Add button. Save the resulting image as HN_L_RRGB.fts. The RRGB reminds you that the luminance image has a double dose of the red channel in it.
When you line up the
images, your computer screen should look something like this:
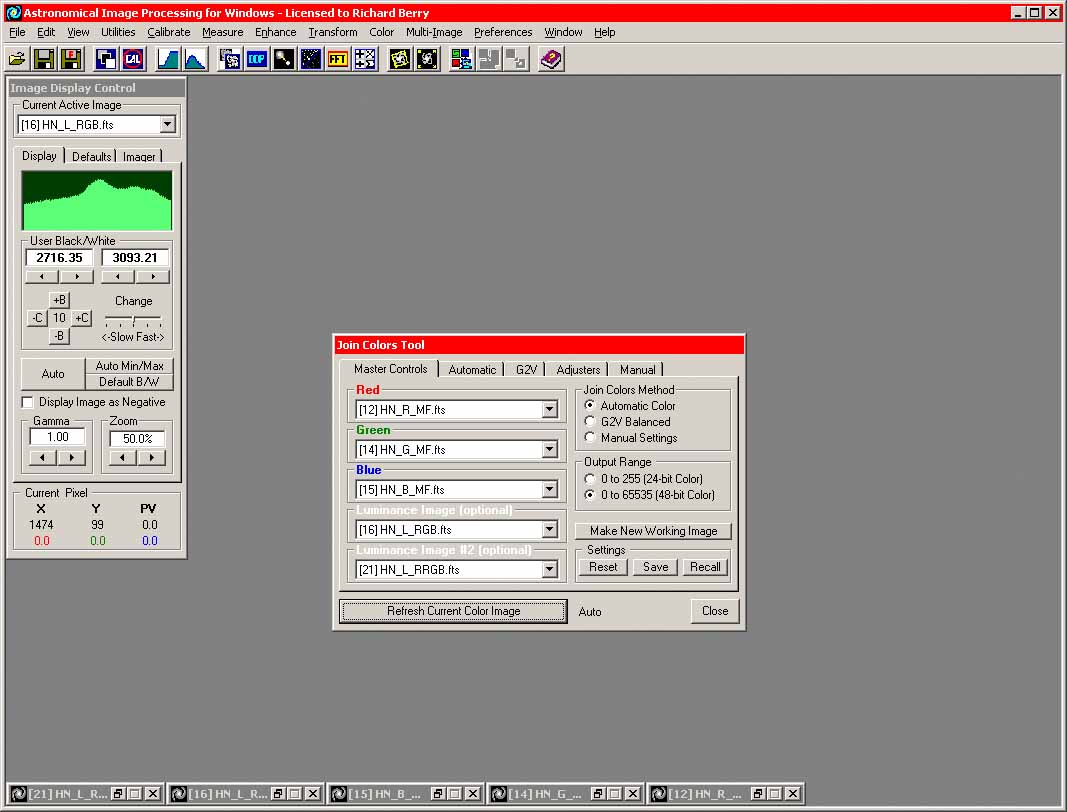
Join the Color Channels
The Join Colors Tool is designed to carry out the complex task of assembling color channels into color images. It is able to automatically balance three color channels to produce a reasonable approximation of good color balance in which white objects appear white, black objects appear black, and the rest of the color fall into place. It can also scale images using a solar-type G2V stars as a "white reference" source. Finally, it supports manual adjustments in gamma (mid-tone brightness), color saturation, color smoothing, and color in the lightest and darkest parts of the image.
This session uses the Join Colors Tool to determine color balance automatically, plus a few minor adjustments to produce a finished color image.
To start the Join Colors Tool, do the following:
Minimize the images to create some working space on the screen.
From AIP4Win's main menu, select Color > Join Colors Tool....
The Join Colors Tool will open.
Select the Master Controls tab.
In the Setting panel, click the Reset button. This restores the tool's default values and behaviors.
In the Join Colors Method panel, select the Automatic Color radio button.
In the Output Range panel, select the 0 to 65535 (48-bit color) radio button.
In the Red panel, select the red color channel from the file names in the list box.
In the Green panel, select the green color channel from the file names in the list box.
In the Blue panel, select the blue color channel from the file names in the list box.
In the Luminance Image panel, select the first luminance image from the file names in the list box.
In the Luminance Image #2 panel, select the second luminance image from the file names in the list box.
The screen
should now look something like this:
 .
.
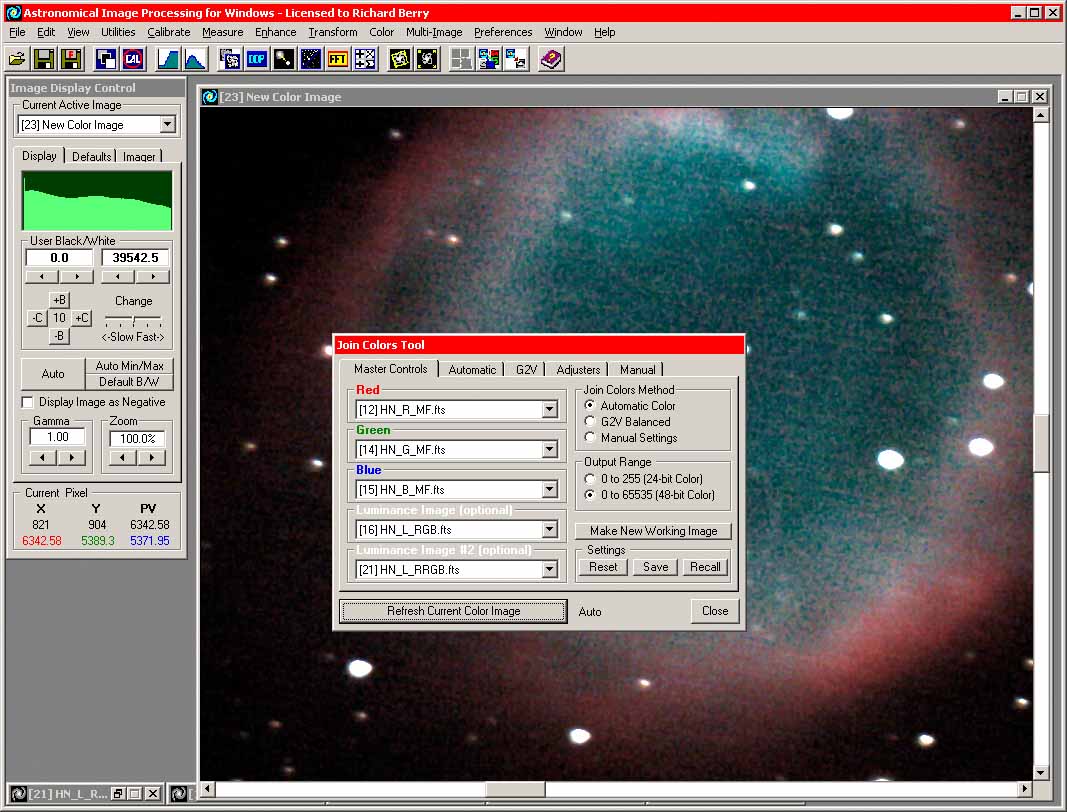
Click the Make Color Image button (on the screen above, this button says: Make Color Image).
AIP4Win will create a color image.
Note that the name of the Make Color Image has changed to Refresh Current Color Image. Each time you click this button, AIP4Win will rebuild the color image using parameters that you have selected.
The screen
should now look something like this:
Select the Manual tab.
If the image is too large on the screen, go to the Image Display Control, in the Zoom panel, and click the left zoom button.
In the Color Balance Buttons panel, click on the +S button to make the sky background brighter. (Clicking on -S makes the sky background darker.)
If necessary, click three or four times on the +S button until the sky is dark gray rather than pure black.
In the Color Balance Buttons panel, click on the +L button to make the image brighter. (Clicking on -L makes the image darker.)
If necessary, click three or four times on the +L button. Stop when the brightest parts of the nebula start to lose their color or turn white.
Select the Adjusters tab.
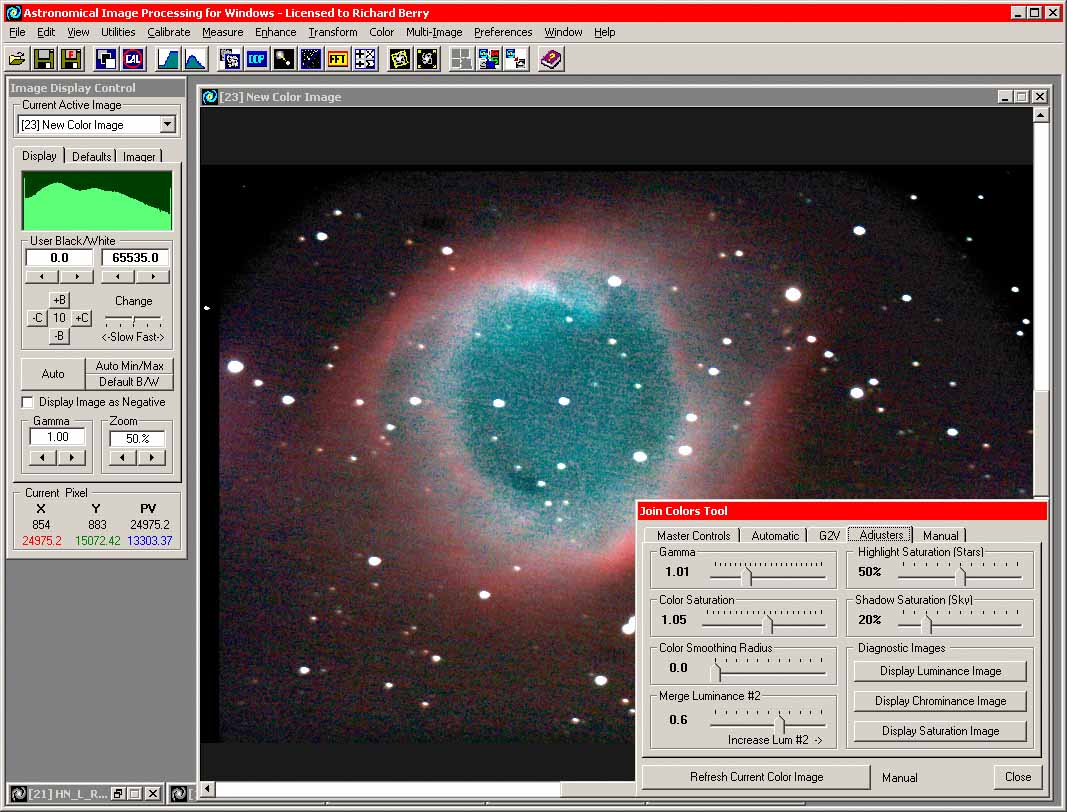
In the Merge Luminance #2 panel, the slider controls how the two luminance images blend. The default is 0.5, that is, a 50/50 mixture.
Slide the Merge Luminance #2 slider left to 0.
Click on the Refresh Current Color Image button. With the first luminance image, greens and blues will appear stronger.
Slide the Merge Luminance #2 slider right to 1.0.
Click on the Refresh Current Color Image button. With the second luminance image, red parts of the nebula will appear stronger.
Experiment with the Merge Luminance #2 slider until you are happy with the appearance of the image.
Adjust the
other sliders to learn their effects:
Gamma -> adjusts the middle tones of the image. Higher
values make the middle tones brighter.
Color Saturation -> controls the strength of the color
image. Higher values make the color stronger.
Color Smoothing Radius -> blends colors over a region
defined by the radius setting.
Highlight Saturation -> controls the amount of color
in star images. Higher values reduce star color.
Shadow Saturation -> controls the amount of color in
the sky background. Higher values increase background sky
color.
The slider
settings in the screen above are reason for this image.
Gamma =1
Color Saturation = 1.05
Color Smoothing Radius = 0.0 (i.e., no smoothing)
Highlight Saturation = 50%
Shadown Saturation = 20%
Note: You can save the current version of the color image at any time. You may wish to save several different versions.
When you are satisfied, exit the Join Colors Tool by clicking on the Close button.
Crop the Color Image (optional step)
You may wish to crop the image. If you do, here's how to do it:
Save the Color Image
To save the finished image, do the following:
From AIP4Win's main menu, select File > Export.
The Export File As dialog will appear.
This value (191) is the signal from the nebla.
In the Save As Type listbox, select TIFF.
Type a reasonable file name such as Helix Nebula (2006-09-18) color.tif.
Click the Save button.
With the TIFF option, the Save TIFF dialog box will appear.
Select the 16-bit radio button.
Click the OK button.
The image will be saved as a 16-bit-per-channel TIF file (48-bits total).
You can edit images saved in this format in PhotoShop or any other program that accepts 48-bit color TIFF images.
To save an image for the Internet, select JPEG instead of TIFF in step 3 above.
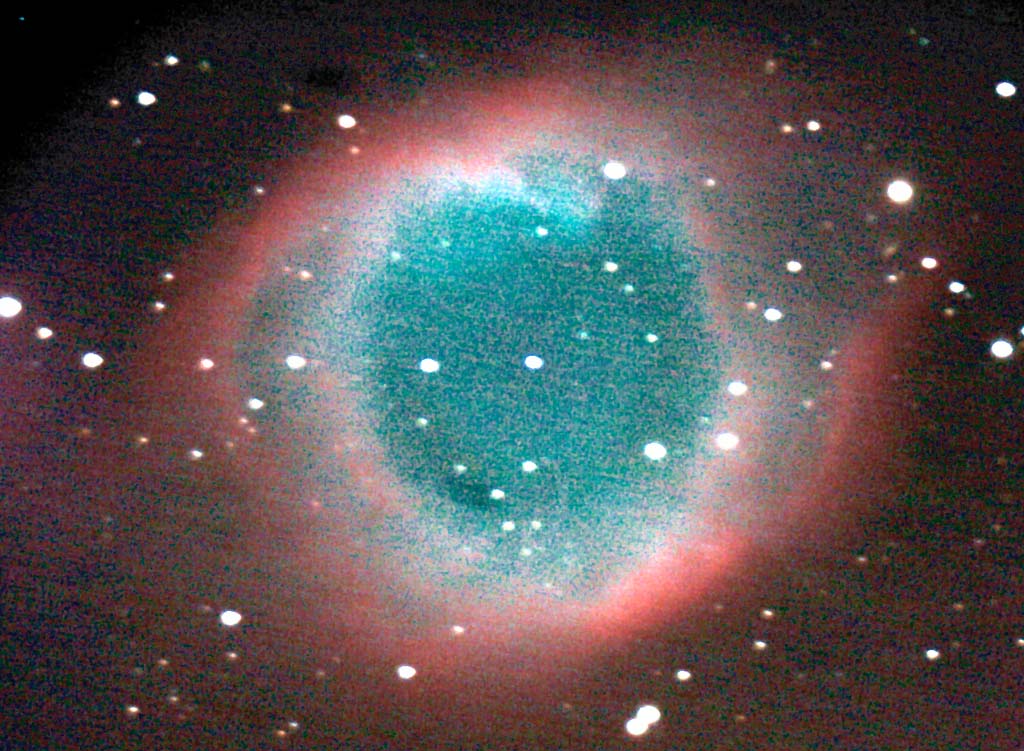
The image above came straight out of AIP4Win. The screen grabs above record the process.
Can your digital camera do better than this? Certainly! All that's needed is more exposure time, better tracking, a faster optical system than the f/10 telescope used, and possibly making dark frames so as to reduce the number of hot pixels in the image.
Return to the Digital Imaging with Richard Berry homepage.